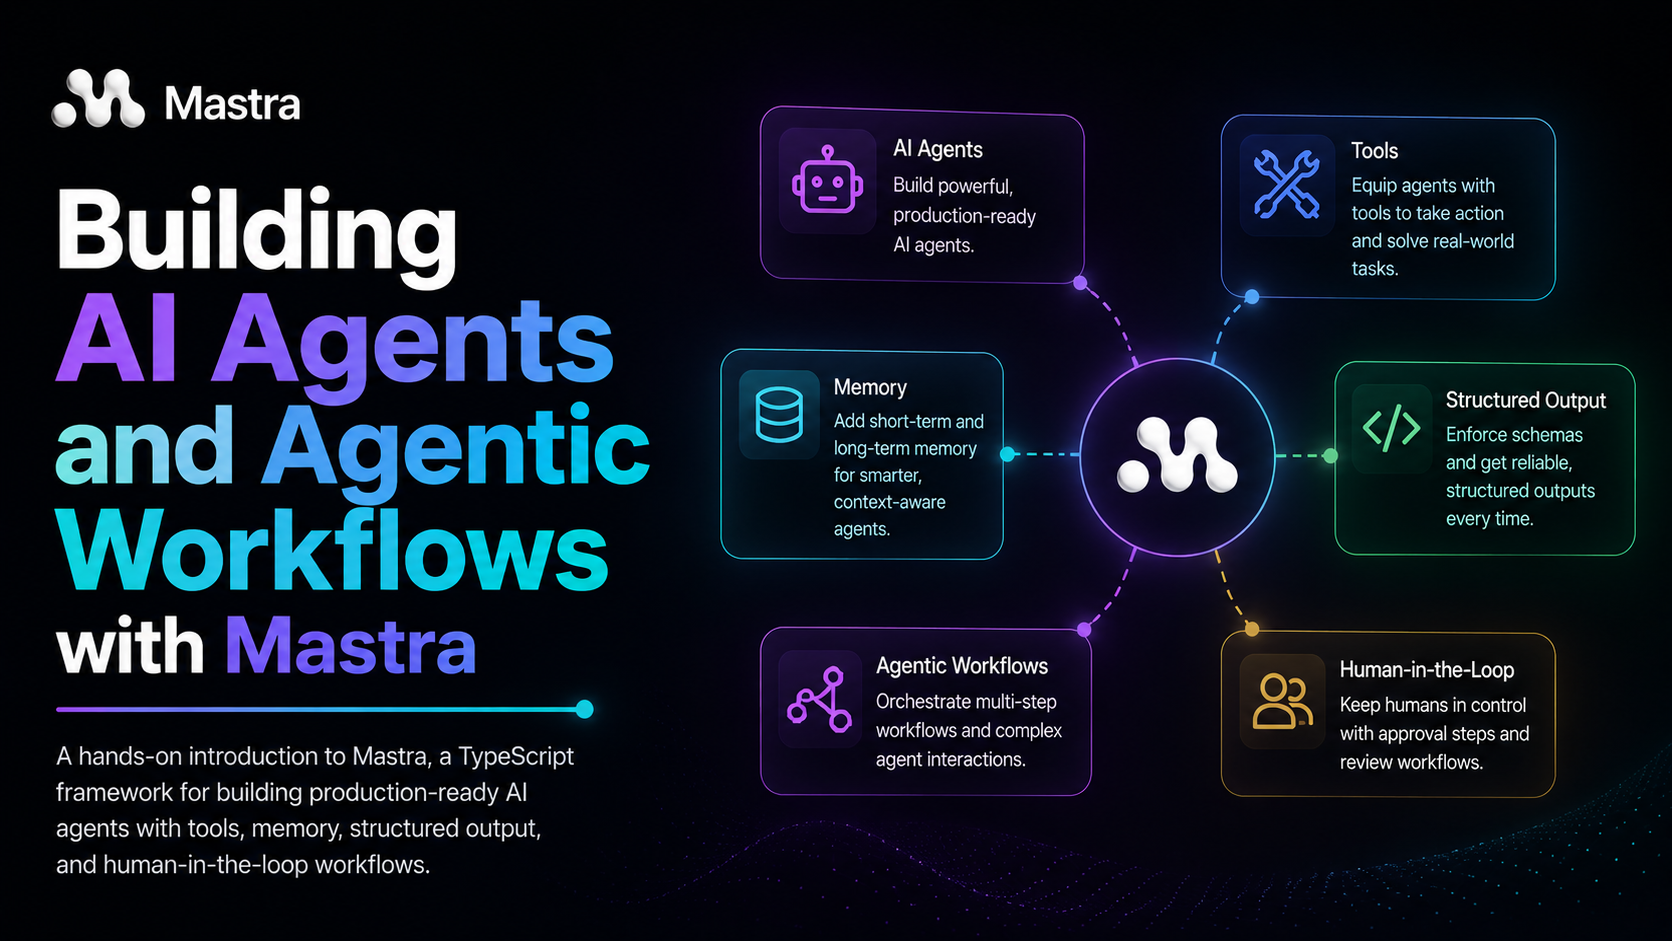
Introduction to Mastra
I still remember the first time I wired an LLM (Large Language Model) into a side project. It was OpenAI’s API, back when ChatGPT had just taken the world by surprise. It felt almost magical. A few API calls, a text box, and suddenly the app could answer questions. That was enough for a while. But the longer I worked with it, the more I wanted it to do things, not just say things. Check a database. Call an API. Decide what to do next based on what it found. The moment you start wanting that, a simple API call is no longer enough.
import { generateText } from "ai";
import { openai } from "@ai-sdk/openai";

const { text } = await generateText({
  model: openai("gpt-4o"),
  prompt: "Send a meeting summary email to my team.",
});

console.log(text);
// Subject: Meeting Summary...
In the example above, the model returns a perfectly reasonable response. However, no email was sent. It wrote what an email could look like, but it could not actually send one. The moment you need it to take real action (call an API, check live data, remember what you said yesterday), you are writing all of that yourself.
That desire is what pushed developers toward building agents. An agent is not just a model that responds to prompts. It is a model that can use tools, observe results, and keep acting until a goal is met. Think of it like the difference between asking a colleague a question and asking them to handle an entire task. One gives you an answer; the other gets things done.
As agents became more practical, though, the complexity of building them grew quickly: managing the loop between the model and its tools, persisting conversation memory, enforcing safety rules, coordinating multi-step workflows. None of that is trivial to wire together from scratch. However, that is the gap frameworks like Mastra are filling.
What is Mastra?
Mastra is an open-source TypeScript framework for building AI agents and agentic workflows. The core idea is simple: agents should be first-class objects in your codebase, not ad-hoc glue code scattered across files.
If you have used Express.js before, think of Mastra as something similar in spirit. It gives you structured primitives (agents, tools, memory, workflows) and handles the plumbing, so your code stays focused on what the agent is supposed to do rather than how to make it run. You define an agent the same way you would define any other module in TypeScript: with typed inputs and outputs, explicit dependencies, and a clear interface.
Under the hood, Mastra uses the AI SDK for model interaction, which means it works with providers such as OpenAI, Anthropic, Gemini, and others. In this article, we will keep the setup simple and use OpenAI through the official AI SDK provider.
Where can it be used?
Because Mastra is just a TypeScript library, it runs anywhere Node.js runs. That makes it practical for a wide range of scenarios. Internal tooling is a natural fit: agents that query databases, manage cloud resources, or trigger CI/CD pipelines in response to natural language. Customer-facing assistants are another: support bots with memory and tool access that can hold a multi-turn conversation without losing context between messages. You can also use it for automated pipelines: workflows that ingest data, process it through multiple steps, and produce structured reports, with optional human-in-the-loop checkpoints (pauses where a human must approve before the workflow continues) along the way.
That last one is exactly what we are building here. But what does a real Mastra application actually look like? Let’s build one.
What we’ll build
Throughout this article, we will build an AI Status Monitor: a lightweight DevOps tool that monitors a set of mock microservices, detects outages, restarts failing services, and notifies your team on Slack.
A user interacts with a chatbot UI that talks to an Express API server. The server exposes two main endpoints: /chat for sending messages to the agent, and /workflow for triggering a repair workflow and resuming it after a human approval step.
The mock services are managed by PM2, a Node.js process manager. Each service exposes a /health endpoint the tools ping to determine its status. Two of the services are intentionally configured to stop after about a minute, simulating real outages for the agent to detect and repair.
A Mastra agent named service_manager handles the conversation, uses tools to check and restart services, and delegates larger repair jobs to a service_repair workflow. That workflow runs multiple steps, maintains shared state across them, and pauses for human approval before sending a Slack notification.
The full source code for the demo is hosted in the runtimepanic-projects repository and follows the same structure described here. Clone the project, install dependencies, set OPENAI_API_KEY, and run it locally. The core dependencies are four @mastra packages: @mastra/core for agents, tools, and workflows; @mastra/memory for conversation history; @mastra/libsql for SQLite storage; and @mastra/mcp for MCP server integration. Beyond those, the project uses express for the API server, zod for schema validation, and the AI SDK with @ai-sdk/openai as the model interface layer.
We are not going to dig into deploying Mastra to production or cover every configuration option the framework offers (the official documentation is the right place for that). Instead, let’s focus on the core features and see how they fit together in a real, working application.
Agents
If you have ever called an LLM API directly, the glue code is familiar: deciding which function to call, parsing responses, handling retries, keeping track of context. An agent takes all of that away from your application code and hands it to the model itself. The model reads the situation, decides what to do, and keeps working until it has an answer.
This section covers how to build an agent in Mastra, wire it to tools, constrain its behavior, and connect it to external services via MCP.
How agents work
Think of an agent as an LLM with a job description and a toolkit. You give it instructions that define its role and what it is allowed to do. You attach tools it can invoke to interact with the world. Then you send it a message.
What happens next is a loop. The model reads your message along with its instructions, decides whether it needs to call a tool, calls the tool if so, reads the result, and continues until it has enough to give you a final response. This is sometimes called the generate loop: generate, act, observe, repeat.
In Mastra, you define an agent using the Agent class:
// file: src/agents/service-manager.ts
import { Agent } from "@mastra/core/agent";
import { Memory } from "@mastra/memory";
import { provider } from "../ai-provider.js";
import {
  checkServiceStatus,
  restartService,
  listServices,
} from "../tools/service-tools.js";

export const statusMonitorAgent = new Agent({
  id: "service_manager",
  name: "Service Manager",
  instructions: `You are an AI-powered DevOps assistant that monitors a set of microservices.

You can:
- List all known services and their ports using the list_services tool.
- Check the health of one or more services using the check_service_status tool.
- Restart failing services using the restart_service tool.

Always confirm with the user before restarting a service. After restarting, check the health again to confirm recovery.`,
  model: provider(),
  tools: { listServices, checkServiceStatus, restartService },
  memory: new Memory({ options: { lastMessages: 20 } }),
});
In the example above, instructions is the agent’s system prompt. It defines what the agent knows about itself, what it can do, and how it should behave. The model field wires it to an LLM provider. The tools field is where it gets its capabilities. We will cover memory in the next section.
To send a message to the agent, you call agent.generate(). In our Express server, the /chat endpoint does exactly that:
// file: src/server.ts
const response = await statusMonitorAgent.generate(message, {
  memory: { thread: threadId, resource: resourceId },
});

res.json({ text: response.text });
Mastra handles the tool dispatch loop entirely behind the scenes. Your application just calls generate() and waits for the final answer.
Setting up the AI provider
Before the agent can do anything useful, it needs a model to think with. Let’s look at how we wire that up. Mastra uses the AI SDK as its model abstraction layer, so the standard OpenAI setup is only a few lines of TypeScript.
Install the OpenAI provider:
npm install ai @ai-sdk/openaiThen set your API key:
OPENAI_API_KEY="sk-..."The model defaults to gpt-4o, but you can override it with the LLM_MODEL environment variable.
// file: src/ai-provider.ts
import { openai } from "@ai-sdk/openai";

export const provider = (modelId: string = process.env.LLM_MODEL ?? "gpt-4o") =>
  openai(modelId);
The provider() function is what the agent receives as its model. Keeping it behind a tiny helper makes the rest of the application independent of the exact model name.
Tools
Tools are how an agent does things rather than just says things. A tool is a typed, executable function the model can choose to call when it needs information or wants to take an action. You define the input schema, the output schema, and the execute function. Mastra handles serializing tool calls to and from the model.
💡 Serializing here means Mastra handles the translation between the model and your code. The model cannot call your function directly. It describes what it wants to do, Mastra runs the matching tool with the right arguments, and feeds the result back to the model.
Tools are defined with createTool. Let’s look at checkServiceStatus, which pings one or more services and returns their health:
// file: src/tools/service-tools.ts
import { createTool } from "@mastra/core/tools";
import { z } from "zod";

export const checkServiceStatus = createTool({
  id: "check_service_status",
  description:
    "Ping one or more services and return their health status. Omit `services` to check all.",
  inputSchema: z.object({
    services: z
      .array(z.string())
      .optional()
      .describe("Service names to check. Omit to check all."),
  }),
  outputSchema: z.object({
    results: z.array(ServiceHealthSchema),
  }),
  execute: async (inputData) => {
    const targets = inputData.services?.length
      ? inputData.services
      : ALL_SERVICES;

    // ping all target services concurrently
    const results = await Promise.all(targets.map((s) => pingService(s)));
    return { results };
  },
});
In the example above, a few things are worth noting. The description field is what the model reads to decide whether to use this tool. Write it for the LLM, not for a human developer. The inputSchema and outputSchema are Zod schemas: Mastra validates inputs before execute runs and validates outputs before the result is returned to the model.
ServiceHealthSchema is a shared Zod schema defined alongside the tools that describes a single service’s health snapshot: { service, port, status, uptime, error }. pingService is a helper that makes an HTTP health check request to a service’s port and returns a result in that same shape.
The application defines two more tools following the same pattern: listServices, which returns a static registry of all known service names and ports, and restartService, which runs pm2 restart for the given services.
Structured output
By default, agent.generate() returns a plain text response. However, when you need structured data (for example, to render a status table in the UI rather than display a paragraph of text), you can pass a structuredOutput schema to get a typed, validated object back instead. You can find more details in the Mastra structured output documentation.
import { ServiceHealthSchema } from "../tools/service-tools.js";

const response = await statusMonitorAgent.generate(
  "What is the current status of all services?",
  {
    structuredOutput: {
      schema: z.object({ results: z.array(ServiceHealthSchema) }),
    },
  },
);

// response.object is fully typed, no string parsing needed
console.log(response.object.results);
Notice that we are reusing ServiceHealthSchema here (the same schema used by the checkServiceStatus tool). This is one of the advantages of defining your schemas in a shared location: the tool output, the agent response, and the workflow state can all speak the same typed language.
If the model returns something that does not conform to the schema, Mastra surfaces the error rather than silently passing invalid data downstream.
Guardrails
An agent that can restart services is useful. An agent that can restart every service at once without any guardrails is a liability. Guardrails let you attach validation logic to the agent’s input pipeline to enforce behavioral boundaries before the model even sees the message.
In Mastra, you implement a guardrail as an InputProcessor: a function that inspects the incoming messages and can inject additional system instructions to steer the model’s behavior when a boundary condition is detected.
// file: src/agents/service-manager.ts
import type { InputProcessor, ProcessInputArgs } from "@mastra/core/processors";

const restartLimitGuardrail: InputProcessor = {
  id: "restart_limit_guardrail",
  processInput: (args: ProcessInputArgs) => {
    const content = String(args.messages.at(-1)?.content ?? "");
    const tooMany =
      /restart\b/i.test(content) &&
      ALL_SERVICES.filter((s) => content.includes(s)).length > 2;

    if (tooMany) {
      args.systemMessages.push({
        role: "system",
        content:
          "GUARDRAIL: Only 2 services can be restarted per request. Politely decline and ask the user to specify which 2 to restart.",
      });
    }

    return args.messages;
  },
};
When the user asks to restart more than 2 services, the processor injects a system message telling the model to decline and ask for clarification. The model never bypasses this. It sees the instruction as part of its context and responds accordingly.
You attach the guardrail to the agent via inputProcessors:
// file: src/agents/service-manager.ts
export const statusMonitorAgent = new Agent({
  // ...
  inputProcessors: [restartLimitGuardrail],
});
💡 You can attach multiple processors and they run in order. Mastra also supports Output Processors via a separate
OutputProcessorinterface. You can inspect the model’s response before it reaches the caller and reject or modify it if it violates a rule.
Human-in-the-loop
Some actions should not happen automatically. Restarting a service in production, sending a team-wide notification, executing an irreversible change: these are the moments where you want the agent to pause and ask rather than act. This is called human-in-the-loop.
Mastra supports it at two levels. At the agent level, it is handled through instructions. Our statusMonitorAgent is explicitly told:
Always confirm with the user before restarting a service.This is intentionally simple. The model reads the instruction and, when a restart is requested, prompts the user for confirmation before calling the restartService tool. The conversation through the chatbot UI is the confirmation mechanism. The user responds, and the agent proceeds.
For workflow-level human-in-the-loop, where you need to genuinely pause execution and resume from an external event, Mastra provides a suspend and resume mechanism. We will go deep on that in the Workflows section.
MCP server integration
Writing a custom tool for every third-party service you want to integrate gets old fast. MCP (Model Context Protocol) is an open standard that solves this by letting agents connect to external tool servers: pre-built servers that expose tools for services like Slack, GitHub, Google Docs, and others. Instead of implementing the integration yourself, you point Mastra at an MCP server and it discovers the available tools automatically.
In our application, a dedicated slackNotifier agent connects to the official Slack MCP server. The entire setup is just an MCPClient and an Agent:
// file: src/agents/slack-notifier.ts
import { MCPClient } from "@mastra/mcp";

export const mcp = new MCPClient({
  servers: {
    slack: {
      command: "npx",
      args: ["-y", "@modelcontextprotocol/server-slack"],
      env: {
        SLACK_BOT_TOKEN: process.env.SLACK_BOT_TOKEN ?? "",
        SLACK_TEAM_ID: process.env.SLACK_TEAM_ID ?? "",
      },
    },
  },
});

export const slackNotifier = new Agent({
  id: "slack_notifier",
  name: "Slack Notifier",
  instructions: `You send Slack notifications. When given a channel ID and message, post the message to that channel using the available Slack tool. Do not modify the message content.`,
  model: provider(),
  tools: await mcp.listTools(),
});
mcp.listTools() fetches the full list of tools from the Slack MCP server and hands them directly to the agent. The slackNotifier does not need to know anything about Slack’s API. It just has tools with names and descriptions, and uses them like any other tool. We will see it in action inside the serviceRepairWorkflow.
💡 MCP servers run as child processes (via
npxhere) or as network services. TheMCPClienthandles the connection lifecycle. You interact with it through a consistentlistTools()interface regardless of the transport.
Supervisor agents
As an application grows, a single agent trying to do everything becomes harder to reason about and harder to maintain. Mastra supports supervisor agents: agents that delegate tasks to other specialized agents as part of a larger workflow. One agent handles routing and intent classification; the specialist agents handle the actual work.
We are not building a supervisor setup in this article, but the pattern is worth knowing. Mastra agents can call other agents as tools, which means you can compose them into hierarchies without any special framework support beyond what we have already covered. The Mastra documentation on multi-agent systems covers this in detail if you want to explore further.
Memory
Here is a scenario that breaks most simple chatbot integrations. A user opens your app, types “check all services”, and the agent dutifully returns a health report: three services are up, two are down. The user then types “restart the failed ones.” Your agent has no idea what “the failed ones” refers to. It was not in the last message. Without memory, every request is the first request.
Memory is what makes follow-up messages like this work. Mastra persists conversation history between turns so the agent always has the context it needs to interpret what the user means, even when they do not spell it out.
When to use memory, and when to skip it
Not every agent needs memory. If your agent handles discrete, self-contained requests (“summarize this document”, “translate this sentence”), there is no conversation context to maintain, and adding memory just adds overhead.
However, if your agent is the conversational entry point of your application (as service_manager is), memory is essential. Users will refer to previous results, ask follow-up questions, and expect the agent to remember what was said three messages ago. A stateless agent in that context is frustrating to use.
The rule of thumb is simple: if your users are having a conversation, use memory. If they are issuing one-off commands, skip it.
Message history with SQLite
Let’s look at how memory is wired up. Mastra’s message history stores the last N messages of a conversation in a database, scoped to a thread (a single conversation) and a resource (the entity the conversation belongs to, typically a user ID).
💡 Both
threadIdandresourceIdare plain strings. Mastra creates the thread in storage automatically on the firstgenerate()call. The caller is responsible for generating and persisting them so the same thread is reused across requests.
The storage backend is configured on the Mastra instance. Our application uses LibSQLStore, which writes to a local SQLite file:
// file: src/mastra.ts
import { Mastra } from "@mastra/core";
import { LibSQLStore } from "@mastra/libsql";

const storage = new LibSQLStore({
  id: "status_monitor_store",
  url: "file:./data/status-monitor.db",
});

export const mastra = new Mastra({
  agents: { statusMonitorAgent },
  workflows: { serviceRepairWorkflow },
  storage,
});
The storage instance is shared across agents and workflows. Mastra uses it to read and write conversation history automatically. You do not interact with it directly.
On the agent side, you attach a Memory instance that controls how much history is loaded into each request. In the service_manager agent definition we saw earlier, this is configured with lastMessages: 20:
// file: src/agents/service-manager.ts
import { Memory } from "@mastra/memory";

new Agent({
  // ...
  memory: new Memory({ options: { lastMessages: 20 } }),
});
This tells Mastra to include the last 20 messages from the thread in every call to agent.generate(). The model sees them as part of its context, just like a normal conversation history.
The final piece is passing the thread and resource identifiers when calling generate(). In our Express /chat endpoint, these come from the request body:
// file: src/server.ts
const { message, threadId, resourceId } = req.body;

const response = await statusMonitorAgent.generate(message, {
  memory: { thread: threadId, resource: resourceId },
});
The threadId identifies the conversation, and resourceId identifies who it belongs to. Mastra loads the matching history from SQLite, prepends it to the context, and sends everything to the model together.
💡 Accepting
threadIdandresourceIddirectly from the client, as shown above, is fine for a demo but a security risk in production. A user could pass any ID and read someone else’s conversation history. In a real application,resourceIdshould be derived server-side from the authenticated session (for example, from a JWT claim), never trusted from the request body.threadIdshould either be generated server-side and stored against the user’s session, or validated to confirm it belongs to the authenticatedresourceIdbefore use.
Let’s walk through what this looks like in practice. The user sends:
“Check all services.”
The agent calls check_service_status tool, gets back the health of all five services, and responds with a summary: three are up, auth-service and payment-service are down. Mastra stores this exchange in the thread.
The user then sends:
“Restart the failed ones.”
This time, Mastra loads the previous exchange and includes it in the context before calling the model. The model sees the original health check result and understands that “the failed ones” refers to auth-service and payment-service. It calls restart_service tool with those two names, with no clarification needed.
Other memory capabilities
Message history covers most conversational use cases, but Mastra also ships three additional memory types worth knowing about.
- Semantic Recall retrieves past messages based on semantic similarity to the current message, rather than recency. If a user asks something related to a topic discussed twenty messages ago, too far back for
lastMessagesto catch, semantic recall can surface it. It is useful for long-running conversations where important context would otherwise fall out of the window. - Working Memory lets the agent maintain a structured, persistent profile for each user (name, preferences, goals) that it carries across all conversations. Think of it as the agent’s notepad: it reads from it at the start of a session and updates it when it learns something new.
- Observational Memory uses a background agent to continuously summarize and compress the conversation history into a dense observation log. It replaces raw message history with a condensed representation, which is useful when conversations get long and raw message history starts to eat into the context window.
For our status monitor, lastMessages: 20 is enough. Conversations are short and task-focused. However, if you were building a long-lived support agent or a personal assistant that needs to remember user preferences across sessions, these are the tools you would reach for.
Workflows
Agents are good at conversations. They handle ambiguity, decide what tools to call, and respond naturally to follow-up messages. However, some jobs are not conversations. They are structured pipelines with defined inputs, ordered steps, and a clear finish line. Running a full service repair cycle is one of them: check all services, restart the failing ones, verify recovery, then ask for approval before sending a notification. Wiring that through an agent is possible, but fragile. You want each stage to be a typed, validated unit with a clear interface.
This is what Mastra workflows are for.
What are workflows?
A workflow is a sequence of steps. Each step has an input schema, an output schema, and an execute function. Steps are wired together in a chain, and the output of one step becomes the input of the next. The whole workflow has a top-level input schema and an output schema, and execution is tracked and persisted by Mastra.
💡 One constraint worth knowing upfront: the first step’s
inputSchemamust match the workflow’sinputSchema, and the last step’soutputSchemamust match the workflow’soutputSchema. Mastra enforces both at.commit()time.
Here is the serviceRepairWorkflow definition:
// file: src/workflow/service-repair.ts
import { createWorkflow } from "@mastra/core/workflows";
import { z } from "zod";

export const serviceRepairWorkflow = createWorkflow({
  id: "service_repair",
  inputSchema: z.object({
    services: z
      .array(z.string())
      .describe("Services to target. Empty array = all services."),
  }),
  outputSchema: z.object({
    sent: z.boolean(),
    message: z.string().optional(),
  }),
})
  .then(checkInitialHealth)
  .branch([
    [
      async ({ inputData }) => inputData.failingServices.length > 0,
      repairWorkflow,
    ],
    [
      async ({ inputData }) => inputData.failingServices.length === 0,
      passHealthyStatus,
    ],
  ])
  .then(sendRepairSummary)
  .commit();
In the example above, checkInitialHealth always runs first. The .branch() then routes to one of two paths depending on whether any services are failing. Both paths converge at sendRepairSummary, which handles the final notification. .commit() finalises the workflow definition. Steps cannot be added after this point.
Individual steps are defined with createStep. Here is checkInitialHealth:
// file: src/workflow/service-repair.ts
import { createStep } from "@mastra/core/workflows";

const checkInitialHealth = createStep({
  id: "check_initial_health",
  inputSchema: z.object({
    services: z.array(z.string()),
  }),
  outputSchema: z.object({
    statuses: z.array(ServiceHealthSchema),
    failingServices: z.array(z.string()),
  }),
  execute: async ({ inputData, requestContext }) => {
    const targets = inputData.services.length
      ? inputData.services
      : ALL_SERVICES;

    const { results } = await checkServiceStatus.execute!(
      { services: targets },
      { requestContext },
    );
    const failingServices = results
      .filter((r: ServiceHealthResponse) => r.status !== "up")
      .map((r: ServiceHealthResponse) => r.service);

    return { statuses: results, failingServices };
  },
});
In the example above, the execute function receives inputData (validated against the step’s inputSchema) along with context helpers like setState and requestContext. The return value must match the outputSchema. If it does not, Mastra rejects it before passing it to the next step.
💡 Mastra also supports running steps in parallel using
.parallel([stepA, stepB])instead of.then(). Our workflow is sequential, but parallel execution is useful when steps do not depend on each other, for example, checking multiple services concurrently without waiting for each one.
State sharing
Each step normally only receives the output of the immediately preceding step. But sometimes you need data that cuts across the whole run, not just one step’s output feeding the next. In our case, sendRepairSummary needs failingServices from checkInitialHealth, which ran two steps earlier, before the branch.
Mastra handles this with workflow state: a shared object that any step can write to or read from across the entire run. You define its shape with stateSchema on the workflow, write to it with setState, and read it via the state field in any step’s execute function.
The state schema is declared on the workflow alongside the input and output schemas:
// file: src/workflow/service-repair.ts
export const serviceRepairWorkflow = createWorkflow({
  id: "service_repair",
  stateSchema: z.object({ failingServices: z.array(z.string()).optional() }),
  inputSchema: z.object({ ... }),
  outputSchema: z.object({ ... }),
})
In checkInitialHealth, once the failing services are known, they are written to state:
// file: src/workflow/service-repair.ts
const checkInitialHealth = createStep({
  id: "check_initial_health",
  stateSchema: z.object({ failingServices: z.array(z.string()).optional() }),
  // ...
  execute: async ({ inputData, requestContext, setState }) => {
    // ... check services ...
    await setState({ failingServices });
    return { statuses: results, failingServices };
  },
});
💡 The workflow’s
stateSchemais the master schema containing all possible state fields for the entire run. Each step then declares its ownstateSchemawith only the subset of fields it needs to read or write, it does not need to know about the rest.
In sendRepairSummary, the state is read directly. No need to reach back through the step chain:
// file: src/workflow/service-repair.ts
execute: async ({ inputData, suspend, resumeData, state }) => {
  const failing = state?.failingServices ?? [];
  // ...
};
In the example above, state is typed from the stateSchema declared on the step, so state.failingServices is fully typed with no manual annotation needed. The ?. fallback handles the case where the step ran before any state was written.
💡 Mastra also provides getStepResult as an alternative for accessing an earlier step’s output directly. It takes a step ID and an explicit type parameter:
getStepResult<{ failingServices: string[] }>("check_initial_health"). State sharing is the better choice when the data is genuinely global to the run and more than one step might need it.getStepResultis more appropriate when you just need a specific earlier step’s full output without modifying the workflow’s state contract.
Control flow
Workflows are not always straight lines. Our serviceRepairWorkflow uses .branch() to route to different steps depending on the outcome of checkInitialHealth:
// file: src/workflow/service-repair.ts
.branch([
  [async ({ inputData }) => inputData.failingServices.length > 0, repairWorkflow],
  [async ({ inputData }) => inputData.failingServices.length === 0, passHealthyStatus],
])
In the example above, each condition is an async function that receives inputData (the previous step’s output). Mastra evaluates conditions in order and runs the first matching branch. Only one branch executes.
The failing services branch routes to repairWorkflow, a nested workflow that chains restartFailingServices and checkFinalHealth:
// file: src/workflow/service-repair.ts
const repairWorkflow = createWorkflow({
  id: "repair_workflow",
  inputSchema: z.object({
    statuses: z.array(ServiceHealthSchema),
    failingServices: z.array(z.string()),
  }),
  outputSchema: RepairResultSchema,
})
  .then(restartFailingServices)
  .then(checkFinalHealth)
  .commit();
This is how you chain multiple steps inside a single branch: wrap them in a nested workflow. The nested workflow’s input and output schemas must match the other branch’s step.
The healthy branch routes to passHealthyStatus, a simple step that returns the initial statuses in the same RepairResultSchema shape. Both branches need to output the same schema so sendRepairSummary always receives consistent data.
Inside restartFailingServices, a plain TypeScript loop handles batching (matching the guardrail we set on the agent):
// file: src/workflow/service-repair.ts
for (let i = 0; i < failingServices.length; i += 2) {
  const batch = failingServices.slice(i, i + 2);
  const { restarted: batchResult } = await restartService.execute!(
    { services: batch },
    { requestContext },
  );
  // process results...
}
The loop is plain TypeScript inside the step’s execute function. Mastra does not require a special API for control flow within a single step.
💡 Mastra provides additional workflow-level control flow APIs for more complex cases:
.foreach(step)applies one step to each item in an array;.dowhile(step, condition)and.dountil(step, condition)repeat a step as long as a condition holds; and.parallel([stepA, stepB])runs multiple steps concurrently. When adjacent steps have mismatched schemas, you can insert.map()between them for input data mapping: a transformation function that reshapes the previous step’s output into the format the next step expects. These are useful when the logic involves multiple coordinated steps rather than code contained within a singleexecutefunction. You can find the full reference in the Mastra control flow documentation.
Using tools and agents in steps
Remember the tools we defined in the Agents section? They are not agent-exclusive. Tools can be called directly inside a step’s execute function by invoking tool.execute!(). This is how checkInitialHealth and restartFailingServices work. They reuse the same checkServiceStatus and restartService tools that the agent uses, without going through the agent at all:
// file: src/workflow/service-repair.ts
const { results } = await checkServiceStatus.execute!(
  { services: targets },
  { requestContext },
);
The requestContext argument is passed through from the step’s execute parameters and carries request-scoped configuration Mastra needs internally.
You can also call an agent from inside a step. The sendRepairSummary step calls slackNotifier.generate() directly after receiving approval:
// file: src/workflow/service-repair.ts
await slackNotifier.generate(
  `Post this message to Slack channel ${process.env.SLACK_CHANNEL_ID} exactly once:\n\n${slackMessage}`,
);
This pattern (sharing tools between the agent and the workflow) means you define the integration logic once and use it in both conversational and automated contexts without duplication.
Human in the loop (HITL with Suspend and Resume)
Some workflow steps should not complete automatically. Before sending a Slack notification to the entire team, you want a human to review and approve. Mastra handles this with suspend and resume: a step can pause mid-execution, hand control back to the caller with a payload, and wait until an external event resumes it.
A step that supports this declares suspendSchema (what it sends when pausing) and resumeSchema (what it expects to receive on resume):
// file: src/workflow/service-repair.ts
const sendRepairSummary = createStep({
  id: "send_repair_summary",
  suspendSchema: z.object({
    prompt: z.string(),
    notification: z.string(),
  }),
  resumeSchema: z.object({
    approved: z.boolean(),
  }),
  inputSchema: z.object({
    repair_workflow: RepairResultSchema.optional(),
    pass_healthy_status: RepairResultSchema.optional(),
  }),
  outputSchema: z.object({ sent: z.boolean(), message: z.string().optional() }),
  execute: async ({ inputData, suspend, resumeData, state }) => {
    const failing = state?.failingServices ?? [];

    // No repairs needed, return immediately without suspending
    if (!failing.length) {
      return {
        sent: false,
        message: "All services healthy, no repair needed.",
      };
    }

    // First execution: suspend and wait for approval
    if (!resumeData) {
      return suspend({
        prompt: "Approve sending the Slack notification with the results?",
        notification: summary,
      });
    }

    // Resumed: check the decision
    if (!resumeData.approved) {
      return { sent: false, message: "Notification cancelled by user." };
    }

    await slackNotifier.generate(`Post this message...`);
    return { sent: true, message: summary };
  },
});
In the example above, the step first checks whether any services were actually failing. If not, it returns immediately without ever reaching suspend(). If repairs were made, the first execution calls suspend(), which serialises the step state to storage and returns a suspended status to the caller. The workflow is paused.
When the user approves, the frontend calls the /workflow/resume endpoint:
// file: src/server.ts
app.post("/workflow/resume", async (req, res) => {
  const { runId, approved } = req.body;

  const run = await serviceRepairWorkflow.createRun({ runId });
  const result = await run.resume({
    step: "send_repair_summary",
    resumeData: { approved },
  });

  res.json({ status: result.status });
});
As you can see above, run.resume() rehydrates the workflow state from storage, re-enters the sendRepairSummary step with resumeData populated, and continues from there. If approved is false, the step returns without sending anything. If true, it calls slackNotifier.generate() and the workflow completes.
Error handling
Workflows fail. A service might not come back up after a restart, an MCP connection might drop, or an unexpected error might surface during execution. The restartFailingServices step handles this by collecting per-service results rather than throwing on the first failure:
// file: src/workflow/service-repair.ts
const restarted: string[] = [];
const errors: { service: string; error: string }[] = [];

for (let i = 0; i < failingServices.length; i += 2) {
  const batch = failingServices.slice(i, i + 2);
  const { restarted: batchResult } = await restartService.execute!(
    { services: batch },
    { requestContext },
  );

  batchResult.forEach((r) => {
    if (r.success) {
      restarted.push(r.service);
    } else {
      errors.push({ service: r.service, error: r.error ?? "unknown error" });
    }
  });
}

return { restarted, skipped: [], errors };
In the example above, the restartService tool returns a result per service with a success flag rather than throwing. The step accumulates successes and failures separately and always returns. The next step receives both the successfully restarted services and the ones that failed, which means the final Slack notification can report a full picture rather than an incomplete one.
That is application-level error handling, fine-grained control over per-service results within the step logic itself. Mastra also provides workflow-level error handling. When a run completes, the result object carries a status field ('success', 'failed', 'suspended', or 'tripwire') and a steps map with each step’s individual outcome. You can also register an onError callback on the workflow to react to failures without wrapping every run.start() in a try/catch:
const run = await serviceRepairWorkflow.createRun();
await run.start({
  inputData: { services: [] },
  onError: (error) => {
    // handle workflow-level failure, e.g. alert or log
  },
});
💡 Mastra also supports declarative step retries via
retryConfigoncreateStep. If a step throws, Mastra can retry it automatically with a configurable delay and maximum attempt count, useful for transient failures like network timeouts. The full error handling reference is in the Mastra error handling documentation.
Demo
We have spent the last few sections looking at the code behind the AI Status Monitor. Let’s put it all together and see it running.
Clone the demo repository, install prerequisites, set OPENAI_API_KEY, and follow the instructions in README.md to get the application running locally.
Starting the application
First, start the five mock services using PM2:
yarn services:startyarn services:status┌────┬──────────────────────┬─────────┬──────┬───────────┬──────┬──────────┐
│ id │ name │ mode │ ↺ │ status │ cpu │ memory │
├────┼──────────────────────┼─────────┼──────┼───────────┼──────┼──────────┤
│ 0 │ auth-service │ fork │ 0 │ online │ 0% │ 28.5mb │
│ 1 │ payment-service │ fork │ 0 │ online │ 0% │ 27.2mb │
│ 2 │ notification-service │ fork │ 0 │ online │ 0% │ 26.8mb │
│ 3 │ inventory-service │ fork │ 0 │ stopped │ 0% │ 0b │
│ 4 │ reporting-service │ fork │ 0 │ stopped │ 0% │ 0b │
└────┴──────────────────────┴─────────┴──────┴───────────┴──────┴──────────┘💡
inventory-serviceandreporting-serviceare configured to crash after one minute without auto-restart. That is intentional, they are our failing services for the demo.
This registers five HTTP services - auth-service, payment-service, notification-service, inventory-service, and reporting-service, on ports 4001 through 4005. Three of them start up and stay running. The other two (inventory-service and reporting-service) are configured to crash after one minute without auto-restart, which gives us something to work with.
Once the services are up, start the API server:
yarn devThen open http://localhost:3000 in your browser to access the chatbot UI.
Querying service health
Let’s start with a simple question to make sure everything is connected. Type the following in the chat:
You: Check the health of all services and tell me which ones are down.
After a moment, the agent pings each service’s /health endpoint and comes back with a structured summary:
Agent: Here is the current health status of all five services:
- auth-service (port 4001) - ✅ up
- payment-service (port 4002): ✅ up
- notification-service (port 4003): ✅ up
- inventory-service (port 4004): ❌ unreachable
- reporting-service (port 4005): ❌ unreachable
Two services are currently down:
inventory-serviceandreporting-service.
Now send a follow-up without repeating any context:
You: Restart the failed ones.
This is where memory earns its keep. The agent remembers the previous exchange and knows exactly what “the failed ones” refers to, with no disambiguation needed. However, before it acts, it follows its instructions and asks for confirmation:
Agent: I am about to restart
inventory-serviceandreporting-service. Shall I go ahead?
Confirm, and the agent calls restart_service for both, waits two seconds for the ports to bind, then checks health again:
Agent: Both services are back up. Here is the updated status:
- inventory-service (port 4004): ✅ up (uptime: 3s)
- reporting-service (port 4005): ✅ up (uptime: 3s)
Running the service repair workflow
The chatbot interaction above covers the conversational path. Now let’s trigger the service_repair workflow directly. Wait for inventory-service and reporting-service to crash again (about a minute after the last restart), then click Run Workflow in the UI.
The workflow runs all four steps in sequence: initial health check, restart, final health check, and then pauses at send_repair_summary, returning a suspend payload to the UI:
{
  "status": "suspended",
  "prompt": "The service repair workflow has completed. Approve sending the Slack notification with the results?",
  "notification": "Service repair complete. Checked 5 services. Failing: inventory-service, reporting-service. Restarted: inventory-service, reporting-service."
}
The UI presents the prompt and the notification content, and waits. The workflow is genuinely paused. Its state is persisted in SQLite. You could close the browser, come back in ten minutes, and resume it from where it left off.
The before/after comparison from the workflow run looks like this:
{
  "before": [
    { "service": "auth-service", "port": 4001, "status": "up" },
    { "service": "payment-service", "port": 4002, "status": "up" },
    { "service": "notification-service", "port": 4003, "status": "up" },
    { "service": "inventory-service", "port": 4004, "status": "unreachable" },
    { "service": "reporting-service", "port": 4005, "status": "unreachable" }
  ],
  "after": [
    { "service": "auth-service", "port": 4001, "status": "up" },
    { "service": "payment-service", "port": 4002, "status": "up" },
    { "service": "notification-service", "port": 4003, "status": "up" },
    { "service": "inventory-service", "port": 4004, "status": "up" },
    { "service": "reporting-service", "port": 4005, "status": "up" }
  ]
}
Approving the Slack notification
Click Approve in the UI. This calls the /workflow/resume endpoint with { approved: true }, which rehydrates the workflow state and re-enters the send_repair_summary step with the approval. The step calls slackNotifier.generate(), which in turn uses the Slack MCP tool to post the message.
The resulting Slack notification looks like this:
⚙️ Service Repair Report > Checked: 5 services Failing: inventory-service, reporting-service Restarted: inventory-service, reporting-service
If you click Reject instead, the workflow resumes with { approved: false }, the send_repair_summary step returns { sent: false, message: "Notification cancelled by user." }, and nothing is posted to Slack.
Alternatives
No tool is the right choice for every situation, and Mastra is no exception. Before wrapping up, let’s be honest about where it fits well and where something simpler (or different) is the better call.
When Mastra is not the right choice
Mastra is a framework for building AI-powered applications. That comes with real weight: a runtime, a storage layer, typed schemas, a lifecycle to manage. If your use case does not need that, you are taking on complexity you do not need.
A few situations where you should look elsewhere:
You only need a single-turn, stateless response. If you are building something like a document summariser, a code formatter, or a one-shot question-answering endpoint, there is no agent loop to manage, no memory to persist, no workflow to orchestrate. A direct call to the AI SDK (or even just fetch to an LLM API) is simpler and easier to maintain.
Your team is not in TypeScript. Mastra is a TypeScript-first framework. If your stack is Python, the better alternatives are LangChain or LlamaIndex for agent workflows, or CrewAI for multi-agent coordination.
You need a simple automation, not an agent. If the logic is deterministic (run this check, send this alert, update this record), a scheduled script or a webhook handler is more predictable and easier to debug than an agent-driven workflow. Reach for Mastra when the decision-making is the hard part, not the execution.
Mastra vs Instruction/Skill files
If you have used an AI coding assistant recently, you have probably encountered instruction files: CLAUDE.md for Claude Code, AGENTS.md for OpenAI Codex, .cursorrules for Cursor, .clinerules and .clineskills for Cline, or copilot-instructions.md for GitHub Copilot. These files let you tell an existing AI assistant how to behave in your project: which conventions to follow, which patterns to avoid, what the codebase is about.
It is worth being clear about what these files are and are not. An instruction file configures an AI assistant that already exists. It shapes how a model responds to you inside your development environment. It does not give the assistant new tools, does not persist memory across users or sessions, does not orchestrate multi-step workflows, and does not integrate with your production systems. It is context, not code.
Mastra is for building new AI-powered behaviour from scratch. You are not customising an assistant. You are creating one. You define the tools it can call, the memory it carries, the workflows it triggers, and the guardrails it operates within. The result is a deployable application that can serve real users, respond to real events, and take real actions.
The question to ask yourself is: who is the end user? If the answer is a developer working in an IDE, an instruction file is almost certainly enough. If the answer is a user in your application, an automated pipeline, or an internal tool running in production, that is where a framework like Mastra earns its place.
The two are not in competition. They solve different problems at different layers. You might use a CLAUDE.md to help Claude Code understand this very codebase while using Mastra to build the agent that runs inside your product.